Kintsugi Beginner's Guide
About Kintsugi
- What is kinstsugi?
- What is urushi lacquer?
- Are TSUGUKITs food-safe ?
- What can I repair and can I not?
- How long does it take to repair an item with kintsugi ?
- What are the optimal conditions for urushi lacquer to dry ?
- What precautions should I take when doing kintsugi ?
- How should I care for objects repaired with kintsugi ?
- The philosophy and history of kintsugi (go to our blog)
Choose your Kintsugi Kit
- How to choose your TSUGUKIT? (go to the other page)
- About your order and shipping (go to the other page)
Preparation while you are waiting for TSUGUKIT to arrive
- Step1. Watch our YouTube Kintsugi Tutorial Video
- Step2. Prepare extra tools/materials you can find at home
- Step3. Set up a peaceful environment and find time you can do kintsugi
FAQs from kintsugi beginners (kintsugi-tip blogs)
- What are the common mistakes during kintsugi processes?
- FAQ about Step 1: Pre-Treatment
- FAQ about Step 2 & 2A: Making Mugi-Uruhi to Stick Pieces Together
- FAQ about Step 2B: Filling the Deep Chips with Kokuso
- FAQ about Step 3: Filling Small Holes with Sabi-Urushi
- FAQ about Step 4: Applying Black Uruhi
- FAQ about Step 5 : Applying the Finishing Layer
- How to repair glasses with kintsugi? (currently writing)
- How to remove the superglue from already repaired plate in order to re-do kintsugi?
Please let us know if your question is not listed on the pages. I am writing helpful blogs for all the beginners!
About kintsugi
1. What is kintsugi?

Kintsugi is the Japanese art of mending broken pottery with gold. The broken pieces are first put back together using Japanese lacquer, also called “urushi.” The lacquer is then dusted with gold powder. It is estimated that the kintsugi repair technique was developed during the Muromachi period (1336–1573 CE). At the time, the art of kintsugi was often used to repair ceramics used in the tea ceremony.
Rather than hiding the cracks, kintsugi highlights them with gold. Items repaired with kintsugi become more precious than before they were broken and they can even turn into real pieces of art.
2. What is urushi lacquer ?

Urushi lacquer is refined sap that is extracted from urushi trees, which can be found in Japan and China. This sap is known for its adhesive properties and it is widely used in Japanese traditional lacquer craft. Unlike chemical resins such as epoxy, urushi lacquer is completely natural and food-safe.
3. Are TSUGUKITs food-safe ?

The TSUGUKITs "Gold Only" and "Traditional" are completely food-safe.
The only ingredient that is not certified food-safe amongst our products is the alternative metallic powder provided in the TSUGUKIT "Practise." For safety, we recommend using it for decorative items. Since this finishing powder is cheaper than gold powder, it is ideal for practising your kintsugi skills.
4. What can I repair and can I not?
TSUGUKIT is to repair broken pottery, porcelain, and ceramics. It cannot be used to repair glass or metal. Wooden items can be repaired with lacquer, but the TSUGUKIT manual is not sufficient for repairing these items, as the some processes are different from the normal kintsugi procedures.

There are also a caution about pottery, porcelain, and ceramics with kintsugi. Some vessels may no longer be usable in the same ways as they were before the repair. For example, if a crack in the bottom of a vase is repaired with kintsugi, the repaired part cannot be soaked in water for too long. (If the crack is at the top of the vase, it can be used as before) However, instead, dried flowers can be served in the vase.

In addition, if the body and lid of an hot pot (=土鍋, Donabe) are repaired with kintsugi, the pot may become too hot and the kintsugi may come off again if the pot is used over an open fire or exposed to high-temperature of the steam. Urushi lacquer which is used for kintsugi repair has a heat resistance temperature of approximately 95°C. Therefore, if you would like to use the pot or the lids that have been repaired with kintsugi, you could use them to just serve food (not for cooking) or those can be just displayed as a kintsugi art after the repair without using as before.
5. How long does it take to repair an item with kintsugi ?

Depending on the number of coats you apply and the environment you find yourself in, the time needed to dry the urushi lacquer can greatly vary. One layer usually takes few days 1 week to dry completely. Therefore, it is very common to take 2-3 months to complete a kintsugi restoration project.
6. What are the optimal conditions for urushi lacquer to dry ?

Urushi lacquer is a living material that is heavily affected by its environment. Optimal conditions to have urushi lacquer dry would be 20 to 25 degrees Celcius (68-77F) and humidity being around 70 to 80%. In order to create optimal conditions for urushi to dry, you can create a Urushi Box.
7. What precautions should I take when doing kintsugi ?
Raw urushi lacquer is known for its capacity to cause strong allergic reactions similar to those of poison ivy when put in direct contact with the skin. Not everyone is sensitive to urushi, but we strongly recommend to use gloves and cover your arms when doing kintsugi. You can also wear safety goggles for extra safety. If you get raw urushi on your skin, please use vegetable oil and remove it before it hardens. If you have an allergic reaction, please soak the affected skin in a warm salt bath, it will help relieve the itchiness.
Please note that Tsugu Tsugu Inc. is not responsible for allergic reactions caused by the urushi lacquer provided in our TSUGUKITs.
Should you have an allergic reaction when using urushi, please contact immediately your physician.
Objects repaired with urushi lacquer are used once the lacquer is completely dry. When completely dry, urushi lacquer does not cause allergic reactions.
8. How should I care for objects repaired with kintsugi ?

Items repaired using traditional kintsugi techniques should be treated with the same care as traditional lacquerware.
Please note the following:
1. Fractured points repaired with urushi lacquer become stronger as time passes. It is recommended that you start using the item 3-4 months after it was repaired.
2. Do not place an item repaired with kintsugi in a microwave, a dishwasher, an oven or an open fire.
3. Always wash by hand. Make sure to wash your repaired item gently and avoid scrubbing around the repaired cracks.
4. Be careful not to scratch the repaired parts when using sharp cutlery such as forks and knives.
5. Please make sure that the parts repaired with urushi lacquer are not damaged by other plates and cups when storing your tableware on your cupboard shelves.
6. Do not place the repaired item in a fridge for too long.
7. Do not soak the repaired item in water for too long.
8. Store the item in a place where it is not directly exposed to sunlight.
Preparation while you are waiting for TSUGUKIT to arrive:
Step1. Watch our Free YouTube Kintsugi Tutorial Video
To visualize how to do kintsugi and become more confident to start kintsugi.
Step2. Prepare extra materials you can find at home
1. Tools and materials in addition to TSUGUKIT
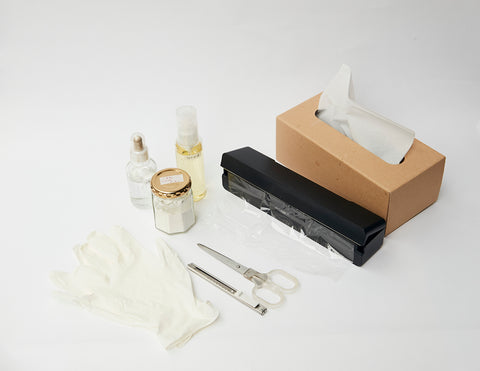
Although TSUGUKIT has all the special tools and ingredients you need to do traditional kintsugi, please prepare following materials which can be easily find at home:
Tissues, one pair of scissors, utility knife, all-purpose flour, oil (canola or salad oil), water, additional rubber gloves, ethanol for disinfection use (+/- 70°), an urushi box (carton, wooden or plastic box which can be closed with a lid), plastic wrap and rubber bands if applicable.
2. Set up an urushi drying chamber

Urushi lacquer is a living material that is heavily affected by its environment. Optimal conditions to have urushi lacquer dry would be 20 to 25 degrees Celcius (68-77F) and humidity being around 70 to 80%. In order to create optimal conditions for urushi to dry, you can create an urushi drying chamber with any carton, wooden or plastic box which can be closed with a lid, a wet towel, and a plastic sheet.
3. Clean your broken object carefully

Any oil, salt, or stains will prevent urushi to harden, so please wash your broken object carefully and dry well before you start kintsugi.
Step3. Set up a peaceful environment and find time you can do kintsugi
When TSUGUKIT has arrived, you can start kintsugi.
If you got any problem while you are doing kintsugi, please join our online lesson from your country. You can make a reservation and purchase a ticket from here.
Online Kintsugi Lesson (English) Ticket【Currently closed due to full reservation】