Thank you for reading my blog.
We have been selling our original kintsugi kit, Tsugu Kit, all over the world since 2020. In order to help all of our customers succeed in kintsugi, we have improved our Tsugu Kit more than 5 times based on feedback from our customers to make them easier to understand.

However, there are some details that cannot be explained in the instruction manual, so I have decided to post all the questions I have received so far, one by one, on this blog.
Here are some things you should do first to create a more beautiful kintsugi finish. However, this is an intermediate to advanced technique, so it is not mandatory for all.

Kintsugi is very beautiful and attractive with its gold lines. In order to draw these delicate fine lines, you must be well prepared in the very first step. Let me give you one piece of information that you should know.
Kintsugi kits sold in the market usually do not describe the process of "mentori (chamfering)" and do not include the tools for it. Our kintsugi kits do not include such tools as well. This is because for those who just want to be able to use their broken vessels again after repairing them or for beginners, it is better to aim for a simple finish without doing anything too complicated, so that they can complete the process of kintsugi without any difficulties. So, kintsugi can be finished without chamfering. However, recently, there are more and more enthusiastic people who want to master kintsugi and become professionals, and the number of people who want to complete a more beautiful kintsugi has been increasing. Therefore, we would like to provide you with all the information we know about chamfering as much as possible in an easy-to-understand manner in this article.
1. What is chamfering?
Chamfering is the process of removing sharp edges. When pottery or porcelain is broken, the corners of the broken pieces are sharp, so chamfering is sometimes used to smooth out the sharp edges.

2. Why should we chamfer in kintsugi?
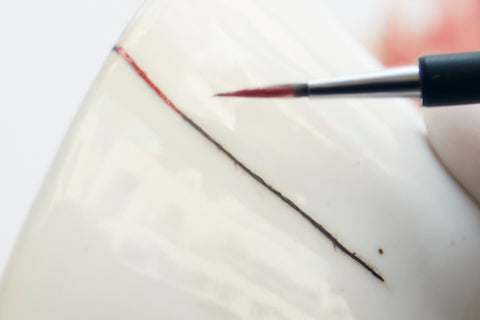
If you stick broken pieces together without removing sharp corners and proceed the process of kintsugi, you will find that many parts are joined almost without any gap. If so, there will be no space to fill in the lacquer paste (Sabi-urushi) in Step 3, and the width of drawing lines in Step 4 will be very narrow
If you still try to draw lines on the narrow joints, you will end up painting lacquer on the surface of the ceramic, which will stick out from the original gap. However, since the seam is slightly dented, after the gold powder is dusted, the indentation will be more visible in the middle of the gold line.

Therefore, if you remove the sharp edge before and/or after sticking broken pieces together, you can create a gap to fill with sabi-urushi in Step 3. The black and bengal-red urushi can be applied only on the gap, and this lead to finishing with the beautiful gold line.
Also, if lacquer is applied directly onto the glazed smooth ceramic skin, the lacquer may come off during use of the repaired vessel as tableware. But if lacquer is applied only over the lacquer paste, it will be firmly fixed.
3. When is the best time to chamfer?
There are two types depending on the shape of the vessel.
The first type is a flat dish. It is recommended that the seam be drilled with an electric router after gluing without chamfering beforehand. The reason is that if chamfering is done before gluing, it is difficult to know by eyes or finger touch whether the pieces are fixed in the correct position without any unevenness when glued. After gluing, fix the pieces with masking tape, but be sure to check for any gaps by using your finger or a bamboo spatula on top of the masking tape. After drying in a urushi drying chamber for at least one week, remove the masking tape, cut off the excess lacquer with a utility knife, and then use an electric router to drill on the seams to a depth where your fingers can hang the surface (enough depth to allow sabi-urushi to be applied inside). Grinding on the surface of glazed pottery is a time-consuming process, but if the ditch is too shallow, sabi-urushi will not be able to get into the spaces and stay in place, so be persistent in your grinding. Unless you want to make the line thicker, be aware of digging deeply so that the hand does not shake and the ditch does not become too thick.

The second type is for deep cups and bowls inside that are difficult to work on later with an electric router. For such shaped vessels, it is recommended to chamfer only the inner section before gluing, which is difficult for the electric router to access later. Be sure not to chamfer both sides of the bowl, since we need to check the other side (outside) to ensure that the bowl doesn't have unevenness when glued. After the glue has been hardened, remove the masking tape and grind on the seems with an electric router only on the outside of the bowls that has not been chamfered before. Since the inside was chamfered already, there is a V-shaped indentation that can be filled with sabi-urushi later without using an electric router.

4. Should I chamfer only the corners or should I chamfer the surface of the broken vessel as well?
Some people often sand or grind the surface of the broken vessel as well, but this is not recommended. The reason is that by leaving the rough surface of a broken vessel, the pieces will interlock like gears when stick together tightly. If you sand the surface to make smooth, it will easily slide off when gluing. Be sure to remove only the corners of the broken surface.

5. How much should I chamfer off?
You should chamfer the corner of the broken pieces (or grind on the cracked line) until the finger nail hangs in the gap when you match those peaces together. The purpose of chamfering is that sabi-urushi (an urushi paste) can stay in the gap on the later step.
If you chamfered the corner too less (if the gap is too shallow), sabi-urushi will not stay in the gap or it will easily come off while you are sanding the surface.
If you chamfer too much, it doesn't harm if the porcelain/earthenware is thick enough. If the porcelain/earthenware is very thin, you cannot chamfer or grind so much. However, it is unnecessary to chamfer too much because you have to fill a lot of sabi-urushi later. By practicing kintsugi many times, espcially in the step4 "filling small holes with sabi-urushi", you will learn the optimal degree of chamfering.
6. Three Tools used for chamfering
The chamfering described above cannot be done with the tools included in regular kintsugi kits. We recommend following special tools.
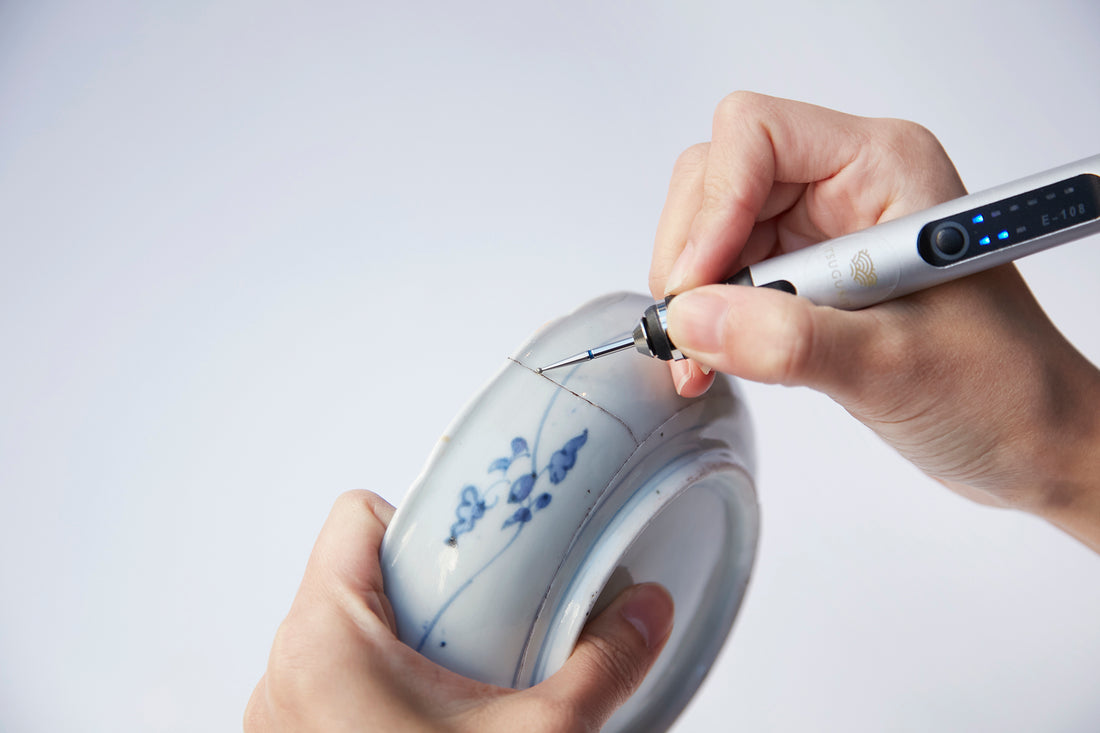
A: Electric router
A pen-shaped machine with a diamond bit on the tip that can be used to sharpen ceramics, porcelain, and glass. There are two types of electric routers: those with a power cord and those that are rechargeable and portable. Electric routers are a bit heavy and can be tiring if you work for a long time, so we recommend using rechargeable portable routers at our studios, where we have many female students, but the ones with power cords are more powerful, so men can work faster. If the diamond bit has a small round shape at the top, it is suitable for digging seams after sticking vessels together. On the other hand, a diamond bit with a tubular shape can be used to quickly remove the inside corners of broken pieces when you repair bowls.

B: Diamond File
Used to chamfer the inside of deep vessels before glueing. The rounded side of the diamond file should be placed against the sharp corner of the broken pieces and used to draw a long line. The price of the diamond file is reasonable.
Be in mind while using both the electric router and the diamond file, because if you concentrate on chamfering only one point, you will end up chamfering deeply in that area, and when you later match the broken pieces together, the thickness of the ditch will vary from place to place!

C: Sandpaper
If you'd like use neither an electric router nor a diamond file, you can sand the sharp corners with #320 or rougher sandpaper (#320 sandpaper is included in our Tsugu Kit). However, you may wear out a lot of sandpaper.

The techniques introduced above are for intermediate level, so the beginners don't have to worry about chamfering with extra tools. If you think you can do basic kintsugi and want to try more advanced technique, please purchase an electric router and/or a diamond file for chamfer to make perfect ditches.
This article focuses on only chamfering, but we will add more articles about kintsugi techniques in the future.
Thank you for reading this article, and we hope for your successful kintsugi!