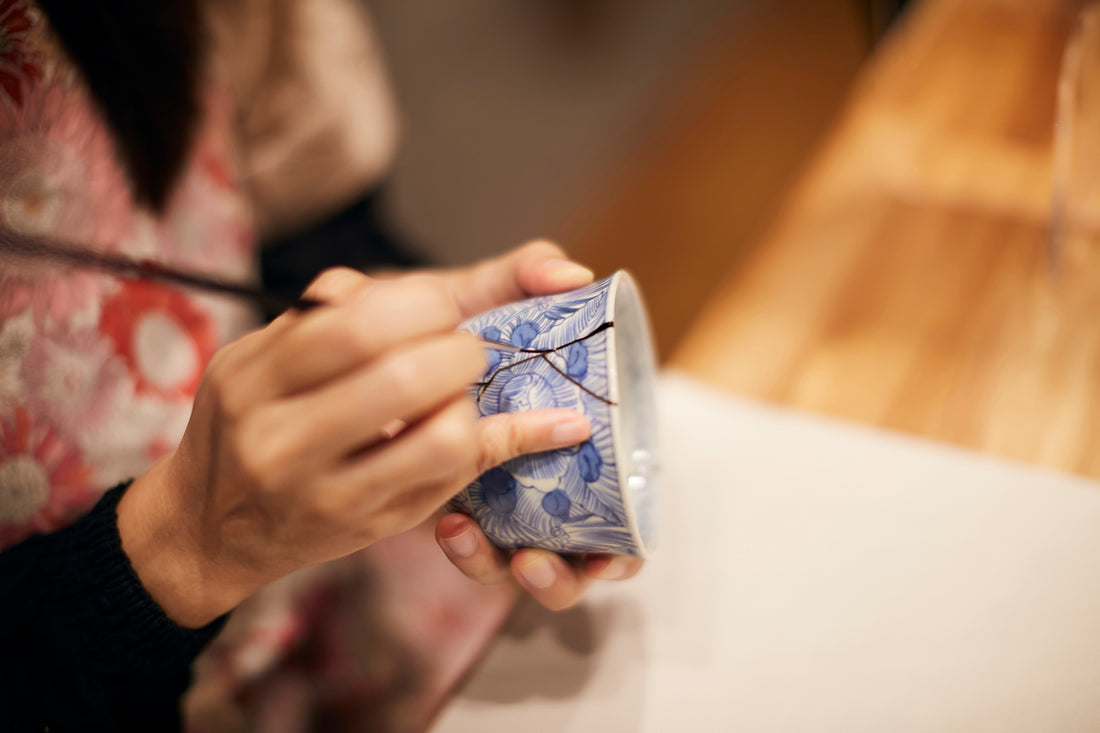
In the fourth step of the kintsugi process, black urushi is made and applied to the damaged area. This process is called "中塗り, Naka-nuri" (middle coat).
This article answers frequently asked questions about the middle coat.
1. The process of applying black urushi

First, the surface of the sabi-urushi that has been dried in the previous step is sanded to a flat surface with No.1000 waterproof sandpaper.
Then, you will make black urushi. Do not add black powder directly to the raw urushi First, you should refine the raw urushi This refining process is called "kurome" in the urushi industry. Since raw urushi contains a lot of water, this water should be reduced. The amount of raw urushi on the palette should be slightly larger than the amount to be applied afterwards (the reason is that after refining, the water evaporates and the amount is slightly smaller). Then, stir the raw urushi with a spatula to let the water evaporate. You can keep stirring with the spatula all the time, but since it takes about 5 to 10 minutes, you can spread the raw urushi once, stir it once a few minutes. While the raw urushi is spread and left to evaporate, you can do other work.
When the raw urushi has reached a clear caramel-like color, collect the raw urushi in the center of the palette so that you can see how much has been left.

Then, add black powder. If you add the same amount of powder as the amount of raw urushi after refining, the liquid will become too viscose, so you should add a smaller amount of powder (about 80% of the volume of the urushi) and mix well. It is very difficult to explain the amount of the powder to add in writing, because it takes experience to know that. If it drips too fast from your spatula, the amount of the black powder is not enough. If it does not drip at all, you may have added too much black powder. If the amount of black powder is too much, the brush will be visible and tend to remain uneven after application.
2. Purpose of applying black urushi

When black urushi (or kuro-roiro-urushi in Japanese) is applied over sabi-urushi, it strengthens the base and adds a waterproofing effect in addition to providing a smooth surface. Urushi has been mixed with black powder and applied to vessels as black urushi from hundreds-year ancient time.
3. Ingredients of black powder

Black powder is made of iron oxide (ferric trioxide, Fe2O3). Some manufacturers use soot of burnt pine or carbon black, but we Tsugu Tsugu uses iron oxide. Black urushi in tubes is often sold by manufacturers (we also sells it), but this is not a mixture of Urushi and black powder, but is made black by adding iron hydroxide in the process of producing raw Urushi through a chemical reaction, thus the manufacturing process and ingredients are different. Urushi that is chemically reacted with iron hydroxide is called Kuroroiro Urushi, not black urushi. Since the middle coating is done many times, we recommend that those who find it tedious to make black urushi by refining raw Urushi and adding black powder each time should purchase Kuroroiro Urushi in a tube. (We, professional kintsugi craftsmen, always use a tube of Kurouro Urushi when we do the middle coating.)
Note: We fill the tubes with black Urushi by hand, so it will take us a little longer to produce and ship them to you.
4. Applying black urushi

At the stage of applying black urushi, the base (sabi-urushi) must be perfectly flat. If it is not flat, sabi-urushi should be filled in the uneven areas again, dried, and sanded to make it flat. If there are unevennesses that are clearly visible to your eyes, it is strongly recommended to go back to the previous step (Step 3). If the unevenness is so minute that it cannot be seen by your eyes, it can be flattened by applying several coats of black urushi. However, since black urushi has almost no thickness, it cannot be flattened by applying one or two coats of Urushi, but sometimes 10 coats are required. Since sabi-urushi has an enough thickness to fill in uneven surfaces, going back to the previous step (Step 3) and filling in with sabi-urushi will often result in a faster completion time.
5. How to find unevenness
If the unevenness is obvious to your eyes, it is highly recommended that the area be filled with sabi-urushi again. But often, when you apply black urushi over sabi-urushi, the brush may get caught and the unevenness will be noticed.
Furthermore, although you did not notice it when you were applying the black urushi with your brush, you may notice small irregularities after the black urushi dries and you sand there with No. 1000 waterproof paper. If it’s uneven, the surface cannot be sanded evenly to a matte finish.
If you are in a hurry to complete the repair, you can proceed to the next step and complete the repair without filling the unevenness and flattening it. However, when gold or silver powder is sprinkled, the unevenness will be more noticeable. If you want to make a beautiful kintsugi finish, we recommend that you always go back to the previous process, even if it takes time, and repeat this process many times to make the line and surface completely flat.
The finishing process cannot fill in the unevenness.
It is very rare for a beginner to proceed to Step 4 without unevenness in one time. Even professional kintsugi craftsmen often go back to Step 3 or apply several coats of black urushi in Step 4.
6. How to apply black urushi over and over
We, professional kintsugi artists, apply at least two coats of black urushi after the sabi-urushi has been completely flattened.
Once the black urushi has been applied, place it in a urushi drying chamber (temperature 20-30℃, humidity 70-85%) to dry. Under optimal conditions, it is said to dry in about 8 hours, but usually it is difficult to keep optimal conditions, so let it dry for at least one day. Longer is better (or safer).

After the black urushi has dried, sand the surface using No.1000 waterproof paper. At this time, do not sand too much to remove all of the black urushi coating, if the surface is already flat. Ideally, sand until the surface of black urushi becomes matte. If there is a mixture of matte and shiny black areas, sand only the shiny black areas to achieve an even matte surface. If the black shiny areas do not disappear even after sanding strongly, this is an indication that the area is dented. Fill it with sabi-urushi or reapply black urushi multiple times.

When applying black urushi over and over, repeat the following processes: apply black urushi, let it dry, sand with waterproof sandpaper until the surface becomes matte, apply black urushi, let it dry, sand with waterproof sandpaper until the surface becomes matte...etc. If you apply black urushi over and over without water sanding, the high spots will become higher and the surface will not be flat, so be sure to sand on the black urushi before you apply one more layer of black urushi.
Ideally, right before going to the finishing process, the areas where black urushi has been sanded should be uniformly matte. If there are any areas where sabi-urushi is visible, apply black urushi again, let it dry, and then sand to ensure that all the areas look matte black. The reason for this is that sabi-urushi will strongly absorb the last layer of urushi and the surface of the absorbed area will be slightly cloudy after you sprinkle gold or silver powder.
7. Tips for applying black urushi
Black urushi should be applied only on top of the sabi-urushi. If you apply it on the other parts of the vessel, it can be wiped off with a cotton swab or tissue with ethanol or sanded off with waterproof sandpaper after it has dried if the vessel has a glazed surface. However, if black urushi is accidentally applied over the surface of an unglazed vessel, it is very difficult to remove and stains will be left.
On the other hand, if you forget applying black urushi on some parts of sabi-urushi, it will create areas of ineffective waterproofing and the area will not be completely flat. Concentrate on applying the black urushi just above the sabi-urushi, without leaving any spots. It is important to see well during this process. If you have poor eyesight, don’t hesitate to use glasses or a magnifying glass.
8. Does the middle coat have to be black?

Black color is generally used for the middle coating of kintsugi, but it does not have to be black. Different colors of urushi can be made by changing the color of the powder added at the end instead of black. There are two patterns of using colored urushi other than black;
(1) The color of the vessel is black, and when black urushi is applied, it is difficult to tell which part is the repairing part.
(2) When you want to finish with silver or platinum powder instead of gold powder, apply black urushi at the very end right before you sprinkle powder. The other color of urushi should be applied one step before so that you can see the color contrast when you apply the last layer of urushi for finish. (Often, we swap bengal-red urushi and black urushi).
*When gold dust is sprinkled at the end, it is common to apply bengal-red urushi at last. The reason for this is that the color of the bengal-red improves the shine of the gold powder. When silver or platinum powders are sprinkled last, black urushi is generally applied under the silver or platinum powders. Black urushi enhances the coloring of silver and platinum powders for the same reason as gold.
Product Page of Black and Bengal-red Pigment : https://tsugu-tsugu.shop-kintsugi.com/products/black-and-red-pigments-for-traditional-kintsugi
9. Finishing with black urushi

Most people believe that kintsugi is finished with gold, but it is also possible to finish with colored urushi. For example, finishing with black urushi on a black vessel will give a chic impression in which it is difficult to tell which part is being repaired. This black finish on the black vessel is also called "闇継ぎ, Yami-tsugi” (repaired dark). Two or more coats of black urushi will give the waterproofing effect and complete the repair.
10. Other Frequently Asked Questions
Q1. Can I apply black urushi directly on top of Mugi-urushi or Kokuso?
A1. That is not good. Always apply black urushi on sabi-urushi.
Q2. Can I make black urushi by putting black powder directly into raw urushi?
A2. That is not good. Always refine the raw urushi first. After the raw urushi has become caramel dark color, add black powder.
Q3. Can I keep the black urushi I made and for how long?
A3. Remaining black urushi can be kept by wrapping it in food wrap and storing it out of the air for about a week. However, black urushi that has been stored in a too warm place (like over 30 degrees celcius) or kept for too long will deteriorate in quality and become difficult to dry, so use fresh urushi whenever possible.
Q4. The black urushi does not dry after a few days. What happened?
Possible reasons are as follows;
(1) Check the conditions of your urushi drying chamber. The optimal conditions for urushi to dry are a temperature of 20-30°C and a humidity of 70-85%.

(2) Urushi will not dry if oil or salt is mixed with it. Check that there is no oil on the brush tip or palette, and if there is, wipe off the oil well with ethanol and a tissue before use.

(3) Your black urushi may have deteriorated because it was stored for a long time or its storage conditions were not good for some reason. Make and apply new black urushi.
(4) Raw urushi has an expiration date and should be replaced with a new one after about one year, regardless of whether it has been opened or not. As urushi gets old and its quality deteriorates, it becomes difficult to dry, so it is recommended to replace the raw urushi with a new one.
Raw urushi product page: https://tsugu-tsugu.shop-kintsugi.com/products/raw-urushi-lacquer-for-kintsugi-and-lacquerware-projects
In the case of (2), (3), (4), eliminate the not-drying black urushi from the vessel by wiping off with ethanol and tissue, and re-apply the black urushi.

The next step is finally the last step!
Thank you for reading this article. Please let us know if you have any questions.
I will add more detailed answers to this article! - Yuki