Broken vessels were sticked together with “Mugi-urushi” and large chips were filled with “Kokuso”. After the vessels are roughly shaped, Step 3 is always taken to flatten the unevenness with “Sabi-urushi”.
Table of Contents
- Ingredients/Materials for sabi-urushi
- Purpose of applying sabi-urushi
- Caution when applying sabi-urushi
- FAQs about sabi-urushi
-
- Q. Should I apply black urushi over all repaired cracks before red, and is it okay to apply Bengal red urushi directly on kokuso?
- Q. I noticed some spots weren’t filled in. Can I apply sabi-urushi to those areas and lacquer again, or do I need to remove the black urushi first?
- Q. How much should I chamfer before continuing the Kintsugi process?
- Q. Can I skip the sabi urushi step and apply black urushi directly?
1. Ingredients/Materials for sabi-urushi

The ingredients used to make sabi-urushi are polishing powder, water, and raw urushi.
Polishing powder is the powder that is produced when the whetstone is cut. We, Tsugu Tsugu, use polishing powder collected from the mountains of Kyoto.
According to our Tsugu Kit manual, first, take the polishing powder on a palette with a spoon, add water little by little with a dropper, and knead it with a spatula to a consistency of hard mayonnaise.
Then, about 60% of that volume of raw urushi is added and kneaded quickly.
sabi-urushi hardens quickly when exposed to air, so place a spatula on top of the sabi-urushi and cover it as a lid so that the sabi-urushi is not exposed to air too much.
2. Purpose of applying sabi-urushi
Role of sabi-urushi in the overall kintsugi process
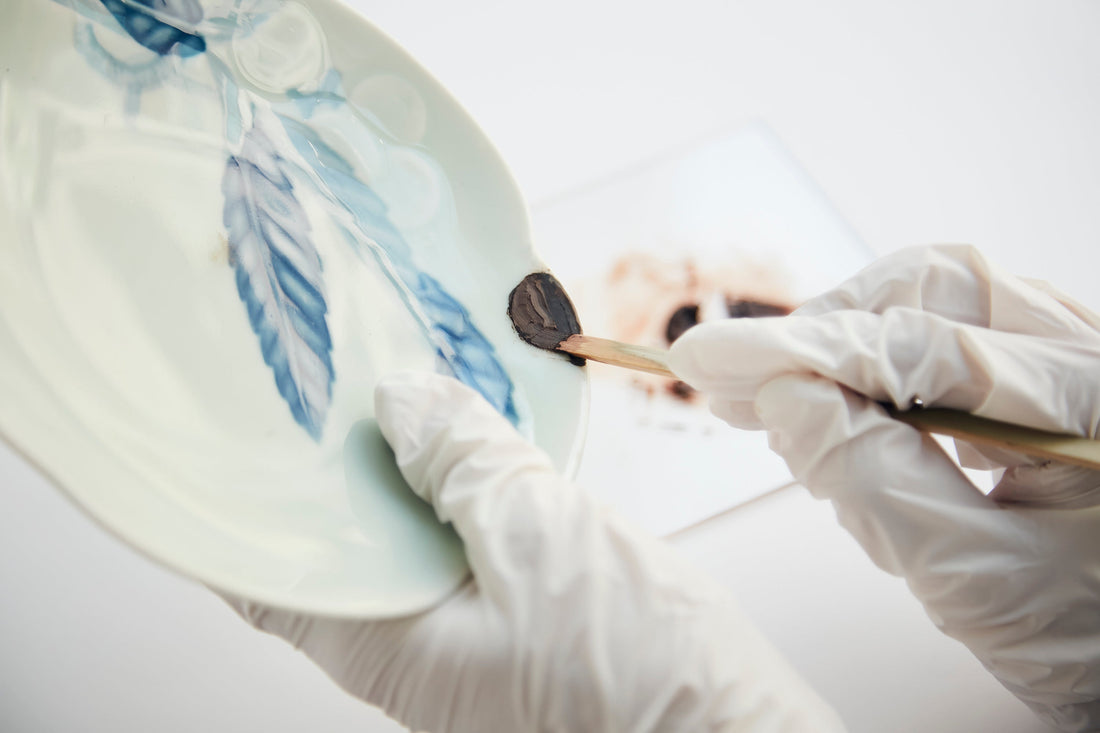
When repairing a broken or cracked vessel, use a bamboo spatula or a "well-turned spatula" (sold separately) to fill the grooves on the vessels with sabi-urushi. If the grooves are not very deep, we recommend using an "electric carving pen" (sold separately) to make the grooves in advance.
Step 2A: Sticking pieces together
Step 2B: Kokuso (filling deep chips ≧ 2mm deep)
Step 3: Sabi-urushi (filling small holes, flatten the surface)
Step 4: black urushi (waterproof)
Step 5: Bengal-red urushi → gold powder
3. Caution when applying sabi-urushi
Before applying sabi-urushi, check the surface of the material of the vessel.
If the surface is not glazed and is rough, and it seems prone to lacquer stains, use masking tape to cover all areas except the damaged parts.
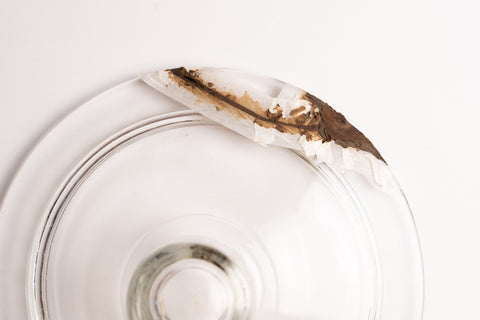
Also when kintsugi is performed on glass, masking tape should be used to cover all areas other than the damaged parts. This is to prevent the sabi-urushi from sticking out from the necessary parts, because the surface of the glass will be easily scratched with sandpaper when sanding the surface of sabi-urushi to make it flat.

When using a fine-point brush to apply sabi-urushi, it is recommended to do it quickly and wash the brush top with oil as soon as the work is finished, since the brush top is easily hardened by sabi-urushi.
In addition to the bamboo spatula, the "well-sticky spatula" (sold separately) is easy to use.
- Well-turned spatula -> Coming soon on our product page
- Electric Carving Pen

4. FAQs about sabi-urushi
Q. I have a Tsugu Kit and I am wondering if I need to cover all my fixed cracks in black urushi before putting the red urushi on top? Urushi in areas where I have applied sabi-urushi? And is it ok to put the bengal red urushi directly on kokuso?
A. After applying and allowing the kokuso to dry, the surface of the kokuso should be polished flat and coated with sabi-urushi. After the sabi-urushi has dried, sand the surface of the sabi-urushi with a fine-grit waterproof paper to flatten it, and then coat it with black urushi.

At the end of the kintsugi process, before applying bengal-red urushi, black urushi must be applied.
Applying black urushi over sabi-urushi serves to waterproof the repaired area and to make the part stronger.
Therefore, after several coats of black urushi are applied to make it very flat, a thin coat of bengal-red urushi is applied and gold powder is sprinkled on it to finish.
The color of the lacquer can be any. It is possible to replace the black color with the bengal-red color and sprinkle silver powder as a finishing. However, gold powder is usually sprinkled on top of the bengal-red color for the better shine, so black urushi lacquer is mainly used for the middle coating.
- For gold powder finish: Black Urushi (for waterproofing) → Bengal-red urushi (for wearing with gold powder) → Gold powder is sprinkled.
- For silver powder finish: Bengal-red urushi (for waterproofing) → black urushi (worn with silver powder) → sprinkle silver powder.
The reason for changing the color of the urushi is to make it easier to see if there are any areas where the lacquer for adhering has not been applied.
Q. After applying black urushi and sanding I noticed some spots seem to not be filled in. Can I re -apply sabi-urushi to missing sections and lacquer again or do I need to sand away black urushi completely first?

A. It is not necessary to remove all of the black urushi with sandpaper, and you can apply sabi-urushi over the areas where a black urushi remains.
By applying black urushi and sanding with water-proof sandpaper, it becomes easier to see areas that are not flat, which were not noticed when sabi-urushi was sanded.
This process is very important to complete a beautiful kintsugi. After applying black urushi, we go back to the process and apply sabi-urushi to the areas that are not completely filled, and then proceed to apply black urushi again. It is common to find areas that are not flat again and apply sabi-urushi...and so on, repeating the process.
Even if the lines and surfaces are not flat, the repair can be certainly completed, but if they are uneven, the unevenness will show up after the gold is sprinkled, so please do not hesitate to go back to the process and repeat many times without giving up.
It is the most difficult part for a professional kintsugi to be able to finish kintsugi without any of these unevennesses.
If the surface has a very very small bump, it can sometimes be eliminated by applying several coats of black urushi, but since black urushi has very little thickness, it is often faster to go back to the process of filling in with sabi-urushi, which results in a faster finish.
Q. I have a question on the chamfering step for Kintsugi repair. How much should I chamfer off before continuing the process?

A. You should chamfer the corner of the broken pieces (or grind on the cracked line) until the finger nail hangs in the gap when you match those pieces together. The purpose of chamfering is that sabi-urushi can stay in the gap on the later step.
If you chamfered the corner too little (if the gap is too shallow), sabi-urushi will not stay in the gap or it will easily come off while you are sanding the surface. surface.
If you chamfer too much, it doesn't harm if the porcelain/earthenware is thick enough. However, it is unnecessary to chamfer too much because you have to fill a lot of sabi-urushi later. By practicing kintsugi many times, especially in the step4 "filling small holes with sabi-urushi", you will learn the optimal degree of chamfering.
For more information on chamfering, please see the following page.
FAQ about Kintsugi Step 1: Pre-Treatment
Please check;
-> Why should we chamfer in kintsugi?
-> How much should I chamfer off?
Q. If the repair is very successful and the break line is as thin as a hair, would it be a problem to skip the sabi urushi step and go straight to applying black?
A. Even if the crack is extremely thin, there will still be a faint, small groove. Please make sure to fill this gap with sabi urushi. Skipping this step may cause the hairline gap to become more visible when the final gold powder is applied.
Thank you for reading this article! - Yuki
2 comments
Hi,
Thank you for your comment!
Regarding your question, if the crack is small or there is a faint groove, I recommend incorporating the rust lacquer process.
If you have any other questions, feel free to reach out!
If the repair is very successful and the break line hair thin would it be problematic to skip the sabi urushi step and proceed to applying black?
Thanks