Introduction
When repairing a chipped vessel with kintsugi, there are two types of putty to fill the chipped area; Kokuso (刻苧, こくそ) and Sabi-Urushi (錆漆, さびうるし). Kokuso is used to fill chips deeper than 1 mm, while sabi-urushi is suitable for filling shallower chips and gaps.

This article answers some of the most frequently asked questions we received about filling chipped areas with kokuso.
1. What is kokuso?

The ingredients used to make kokuso are Mugi-Urushi, wood powder, and polishing powder. Mugi-Urushi is categorized as a "base material" (基材) to harden the ingredients. Mugi-Urushi is made from flour, water, and raw urushi, as described in the previous process, "Matching Pieces Together" (Step 2, 2A). Wood and polishing powder, on the other hand, are categorized as "aggregate" (骨材) to replace the missing parts of the vessel. Wood powder is sawdust from wood and we are often asked what kind of wood is the best. Tsugu Tsugu uses rice pine, but any kinds of wood are fine. The particle should be very fine, because after the chips have been filled up, we sand the surface to completely flat. Also, the polishing powder is made of a fine powder of rock.

There is a common mistake.
"I accidentally filled a chipped area with Mugi-Urushi, not with kokuso. What should I do?"
Since Mugi-Urushi itself cannot be a replacement to a chipped part, you should remove Mugi-Urushi using a utility knife and then make a new kokuso containing wood powder and polishing powder to fill the chipped part.

Once kokuso is made, it can be stored for a certain period of time. Leftover of the kokuso can be used for approximately one week if it is rolled into a ball shape so that the area exposed to air is minimized and wrapped in plastic wrap to keep out from the oxygen, and stored in a cool, dark place such as a refrigerator. However, when you take it out of the plastic wrap next time and use it, do not use the hardened surface of the kokuso. Split the middle of the kokuso and use only the soft part inside. If too little amount of kokuso is stored, it may become hard throughout even within one week. If it is too hard to use, it should be discarded.

2. How to fill chips with kokuso
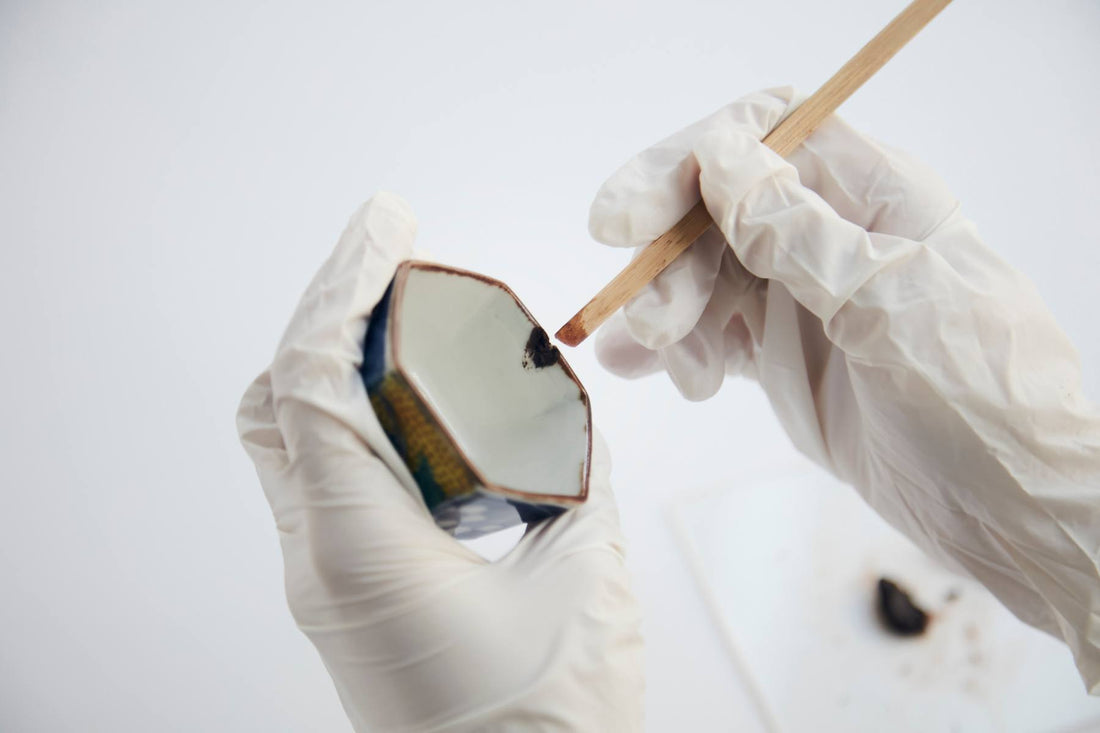
1. How to apply kokuso

Kokuso should be applied in a very thin layer of 0.5mm to 1mm at a time and dried at least over night. The reason for this is that if the kokuso layer is too thick, air cannot penetrate into the kokuso and the inside of the kokuso will not completely dry, increasing the possibility of it falling off during use after the kintsugi process is completed. Urushi lacquer hardens when it combines with moisture in the air, so never apply a thick layer of kokuso, but rather apply a very very thin layer, let it dry, and repeat the process.
Applying kokuso with a bamboo spatula requires a certain technique, and many students claim that kokuso sticks to the bamboo spatula and is difficult to apply. The solution to this problem is to wipe off the kokuso with a tissue every time the kokuso sticks to the bamboo spatula. By doing so, kokuso can be easily removed from the spatula. Then, take a small amount of kokuso with the tip of the bamboo spatula to apply it on the chipped area.
2. Sanding

Repeat the process of applying and drying kokuso, and when all the chips have been filled, sand with 320-grit sandpaper until the surface becomes completely flat. After sanding, make sure that the surface of the kokuso is not higher than the original level of the vessel. This is because sabi-urushi and other types of urushi will be applied on top of the kokuso after this process. The height of the kokuso after sanding should be exactly the level of the vessel, or it could be even slightly lower.
We have been asked whether it is better to sand the surface of kokuso each time before applying kokuso. After a lot of experience, we now believe that you don’t have to sand kokuso each time, but to sand it perfectly only when it has been completely filled. The reason for this is that when sandpaper is used to sand kokuso, sanding powder adheres to the surface of kokuso and another layer of kokuso will be applied on top of the powder. However, if you are not sure if the kokuso is completely filled in, it is a good strategy to sand the surface once to confirm that you filled kokuso sufficiently or not.
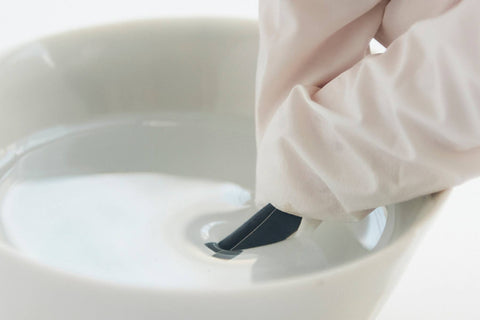
There are two main types of sandpaper used in kintsugi: dry sanding and waterproof sanding paper used with water. Sandpaper for dry sanding usually has a smaller number of grit and a rougher surface. Therefore, it is used at the beginning of the kintsugi process. On the other hand, waterproof sandpaper has a very fine surface of up to 3000 grit. By applying water to the surface of the waterproof sandpaper, the powder from sanding flows out together with the water, reducing to clog the surface of the paper and allowing for very flat sanding. Whether with or without water abrasive, the smaller the number, the coarser the sandpaper; the larger the number, the finer. Therefore, waterproof sandpaper is used in a process closer to finishing.
Here are three things to keep in mind when sanding.
- Sandpaper with a small number of grit has a rough surface that can scratch the vessel or remove the design on the vessel while sanding. Particularly, please pay extra attention to the gold paint on the vessels since the gold paint can be easily removed by sanding. We often apply a masking tape on the gold paint to avoid sanding. Sand only the kokuso part. Depending on the material of the vessel, some scratches will stand out. Glass can be scratched easily and noticeably even with the slightest scratch. Black and shiny vessels also tend to show marks from sanding.
- A common mistake is to use too much force to sand in the wrong direction, causing the entire kokuso to fall off while sanding. Therefore, be very careful about the direction and degree of force when sanding.
- Some people get skin irritation on their wrists caused by the powder from sanded kokuso. Even though the urushi in the kokuso seems dry, the powder contains urushi, so please protect your wrists completely during kintsugi and be careful about the powder that comes out when sanding.
3. How to increase the strength of kintsugi repair

Besides our instruction manual that comes with Tsugu kits, there are some extra preparations that can be done to increase the strength of the kintsugi. This process is called "hardening the ground with raw urushi (生漆による素地固め). In Tsugu Tsugu, we call this "hardening with raw lacquer" (生漆の固め) or "hardening" (固め). Especially with chipped porcelain vessels which have smooth surfaces, it is difficult for kokuso to adhere to the surface, and there is a high risk that the kokuso will fall off after repair in the future. The first step is to confirm that no glaze remains on the chipped surface, and if there is a thin layer of glaze, it should be ground off with an electric router or similar tool. (See the article : FAQ about Kintsugi Step 1: Pre-Treatment) After that, instead of applying kokuso immediately, the follow the steps below:
- Apply raw urushi on the surface of the chipped area with a fine-point brush.
- Immediately wipe it off with a tissue.
- Dry the item in a urushi drying chamber for at least one day.
- Once it’s dried, start applying the kokuso layer.
When wiping off raw urushi with a tissue in the above process 2, wipe it off thoroughly so that no color remains on the vessel. Many people worry about whether all the urushi has been wiped away, but no worries! Only a little lacquer actually remains on the surface. Also, always use the fresh side of the tissue to wipe off the urushi so that the wiped urushi does not touch on other parts of the vessel.
4. How can I fix when all the kokuso parts have fallen off after (or during) kintsugi?
The sadness is immeasurable when a chipped part finally falls off after repeated applications of kokuso... (This actually often happens to students in Tsugu Tsugu's classes.) In this case, the first step is to "harden the base with raw urushi" to increase the strength of the ground as mentioned earlier. Then, if the shape of the part made with kokuso is firm, it can be glued with Mugi-Urushi. If the parts are too small to be glued together, it is better to fill them in by applying multiple layers of kokuso.
5. Caring for your tools

A bamboo spatula is used as a tool for applying kokuso. Since you push the spatula when applying kokuso, bamboo has an optimal strength. After using the bamboo spatula, simply wipe off the tip of the spatula with a tissue. A small amount of urushi will coat the bamboo spatula and make it strong like wipe-lacquering (拭き漆). If you are concerned about the dirts and colors, you can wipe off the urushi completely with a tissue with ethanol. If the tip of the bamboo spatula becomes black because kokuso attached to it, it can be sanded off with 320-grit sandpaper. You can also customize the shape of the bamboo spatula by sanding to the most comfortable use. Craftsmen have been doing so for a long time, making their own tools comfortable.
3. Other questions about kokuso
“I found other methods and materials of kintsugi on the internet to repair chipped areas”

There is no single method of kintsugi, and each artisan has his or her own method. None of them is wrong. Also, the materials used for making kokuso vary from person to person. In addition to wood powder and polishing powder, some artisans mix various materials such as jinoko (地粉, made from rocks, but with larger particles than polishing powder) and cloth powder (powder produced when cutting hemp cloth) as we know. Those materials are available in the natural world and can be used to replace chipped parts in vessels, based on their experience.
Some artisans don’t even use kokuso, but only sabi-urushi and gradually fill in any deep chips.
Our method is designed to be simple with minimal materials so that even beginners can do it without failure. You may try various methods by reading books and searching on the Internet to see how other artisans do. You can find the one that suits you best.
“A large part of my plate is missing and it seems to take a very long time to fill it with kokuso. Is there no other way than filling it little by little with kokuso?”

We, professional kintsugi artists, sometimes repair a large chipped parts with a piece of wood. Wood is cut into the size of the part and filled in. It is faster to embed a piece of wood than to apply a small layer of kokuso. Since this requires woodworking skills and not for beginners, I will not explain it in detail here.

Closing
I feel very happy when a broken or chipped vessel is restored to its original shape again although the parts are still dark brown. Even though the gold has not yet been sprinkled and finished, it is wonderful to see that it is able to be restored to its original shape using only natural materials.
The world of kintsugi is very profound. I will try to answer the questions we receive as many as possible and share them with you in the coming articles.

I hope you enjoy every process of kintsugi!